Thursday, January 19, 2017

Ivan Wyschnegradsky and Diatonic Chromaticism

In the several hundred years that musicians have been working in twelve-note equal temperament, we've barely scratched the surface of what's possible. Moving up to 24-note equal temperament doubles the notes and increases the range of potential tunes exponentially. A twelve-note scale has has 12x12x12 = 1728 melodies with four notes; a 24-note scale gives us 13,824 potential melodies!

That level of freedom can be exhilarating, or paralyzing. Many composers working in quarter tones have treated the quarter tone scale more or less like two normal chromatic scales that are out of tune with each other. That's a good way to start, but there's much more to quarter tones than that.

Ivan Wyschnegradsky devoted his life to studying quarter tones and other microtonal divisions of the octave, and it shows! He slides through the quarter tone scale with ease, inventing rich post-Romantic melodies that drip with emotion and sensuality. To an uninitiated listener, the quarter tones might be jarring at first, but I find that the initial discomfort evaporates quickly as I'm drawn into his inner sound world.

At the foundation of Wyschnegradsky's compositional method is "diatonic chromaticism". Here is his diatonic chromatic scale:

This 13-note scale sounds chromatic, but theoretically it has a lot in common with a normal diatonic scale. It is made up mostly of semitone intervals, with two quarter-tone intervals between the 6th and 7th scale degrees and the 13th and 1st scale degrees (shown with brackets). Similarly, a 7-note diatonic major scale is made up mostly of whole tones, plus two semitone intervals:

Even though Wyschnegradsky's scale sounds a lot like a normal chromatic scale, the little differences count for a lot. There are no major or minor chords in his scale! That fact alone forced him to think outside the box when searching for harmonies. Also, perfect fifths are scarce (only three exist). The most common intervals are the major fourth (a perfect fourth plus a quarter tone) and the minor fifth (a perfect fifth minus a quarter tone). These intervals occur naturally in the overtone series, just like our "normal" consonances of thirds and fifths. They closely approximate intervals around the 11th harmonic (11/8 and 16/11 respectively).

Wyschnegradsky's system replaces the familiar "circle of fifths"
with a circle of major fourths!


Just like in the circle of fifths, the circle of major fourths orders the keys so that moving between adjacent keys will change only one pitch in the scale (shown outside the circle).

When Wyschnegradsky wrote his 24 Preludes, Op. 22, he must have had Chopin and Scriabin in the back of his mind. Both Chopin (Op. 28) and Scriabin (Op. 11) wrote masterful sets of 24 preludes in all major and minor keys, going around the circle of fifths. Wyschnegradsky's preludes use his diatonic chromatic scale in all 24 quarter-tone keys, going around the circle of major fourths. All of his preludes have a clear tonal center, making it easy to hear that the first prelude is in C, the second is in F half-sharp, the third is in B, and so on.

Wyschnegradsky originally wrote these Preludes in 1934 and revised them in 1960. In the introduction to the score, he tells us that he started by restricting himself to using only the pitches in his 13-tone scale. In the revision, he allowed himself to play more freely with hyper-chromaticism, using all 24 pitches per octave.

No doubt his revisions were quite substantial! Some of the best moments in his Preludes are when he takes advantage of the poignant beauty that quarter tones can bring to even simple melodic gestures. One of my favorites is at the climax of the second prelude in F half-sharp. The drooping chords and hyper-chromatic voice leading build up so superbly, thrusting the music to a dramatic peak.

The third prelude in B returns to more "diatonic" sound, even though there is some of Wyschnegradsky's ear-titillating voice leading lurking in the left hand. It reminds me of Prokofiev's Visions Fugitives—a deceptively simple set of miniatures that belies the sublime artistry behind the surface. I love the shimmering trills that slowly descend across the keyboard, bringing the music to a questioning standstill.

With its Bartókian rhythms and driving intensity, the 40 seconds of the fourth prelude in E half-sharp are among the most crowd-pleasing of the set. Echoes of Bartók also come through with the relentless insistence on a descending modal scale, which forms the subject of a rapid-fire canon at the end.

Here are the first four preludes in their entirety:
No. 1 in C: https://youtu.be/4wCWzzvocfU
No. 2 in F half-sharp: https://youtu.be/3YRQjh0RXDo
No. 3 in B: https://youtu.be/eqEe3TeQmDw
No. 4 in E half-sharp: https://youtu.be/zUbSBk_3ZzU

Happy quarter-toning!

Thursday, December 15, 2016

Quartertones for Keyboard Solo

Amid the cobwebs of almost-forgotten piano history lies the strange story of the quarter-tone piano.

A typical piano is tuned in semitones, with 12 equally spaced notes per octave. (Also known as 12-EDO, for 12 Equal Divisions of the Octave.)

Chromatic scale in semitones (12-EDO)

A quarter-tone piano is tuned in 24-EDO, with twice as many pitches per octave. In other words, between any two adjacent notes on a conventional piano (e.g. C and C sharp) there would be an extra note on the quarter-tone piano (e.g. C half-sharp). This requires some extra accidentals, in imaginative shapes.
Ultra-chromatic scale in quarter-tones (24-EDO)

But where can all those extra notes fit? A quarter-tone piano needs twice as many keys as a conventional piano. The intrepid August Förster piano manufacturing company solved this problem by stacking two piano mechanisms on top of one another, with the upper one tuned up a quarter tone.

This beast of a piano was constructed in 1923 on the initiative of Alois Hába, one of the early pioneers of quarter-tone composition. It was followed in 1928 by an upright version for Ivan Wyschnegradsky, a Russian émigré in Paris who devoted himself to becoming the "microtonal Scriabin".

Meanwhile, the quarter-tone bug had spread across the Atlantic. At the instigation of Hans Barth, an experimental pianist and composer, Charles Ives composed his Three Quarter-Tone Pieces in 1923–24 and contributed funds to commission George Weitz of Chickering Pianos to develop an quarter-tone piano. Even though the premiere performance of Ives's Pieces used two pianos (one was tuned a quarter tone up) and two pianists (Hans Barth and Sigmund Klein), Ives originally intended the third piece, a Chorale, to be played by one pianist on a two-manual quarter-tone piano.

Alois Hába, Ivan Wyschnegradsky, and Charles Ives were the vanguard of quarter-tone piano composition, writing ground-breaking works from the 1920s on. But after the initial flurry of mechanical innovation, piano makers abandoned the idea of a single instrument that could play in quarter tones. Those early instruments, once so full of promise, now languish as museum pieces.

Composers turned to a simpler, more practical way of getting quarter tones: using two pianos tuned a quarter tone apart, just as Barth and Klein had done to premiere Ives's Pieces. Mildred Couper, Alan Hovhaness, John Corigliano, and Georg Friedrich Haas all used this method. 

But two-piano writing, with two pianists, is really a different genre to solo writing. Even though many ambitious pianists have played Wyschnegradsky's music on two pianos, it's extremely difficult to recreate the feeling of the piano solo using two instruments. Can you imagine playing the melody line of a Chopin Nocturne on two pianos, alternating back and forth every few notes? That's what it feels like!

I've tossed around the idea of playing Wyschnegradsky's 24 Preludes, Op. 22 as a solo piano piece for years, but I never could quite figure out how to make it work. And then I stumbled across Aron Kallay's pathbreaking recording Beyond 12, and the world hasn't been the same since! Aron Kallay has made a major project of commissioning works for virtually re-tuned piano, which he performs using a MIDI keyboard and Pianoteq software. Composers can re-tune any note to literally any pitch they can imagine. After all, a MIDI keyboard is really nothing more than a controller with 88 pressure-sensitive keys. There's no reason that middle C on the keyboard shouldn't be able to sound at a G sharp... or that two seconds later, by pressing a pedal you can change that same key to sound at a D half-flat!

I play the Wyschnegradsky Preludes on a MIDI keyboard hooked up to my laptop, where I have two virtual Pianoteq pianos running with one tuned a quarter-tone flat. My keyboard playing comes in on MIDI channel 1, and each note is then rerouted (via Pd-extended) to one of the two pianos on channels 2 and 3.


Of course, my keyboard can control only half the notes on the virtual pianos at any one time. I'll map certain keys to certain pitches for one section of the piece, and then I'll need to change to a different key mapping for a different section. I might have to change mappings several times over the course of a prelude, depending on how complex it is. For example, the first prelude is quite simple and has only three different mappings; the second prelude is full of rich chordal writing and needs 15 mappings! To change between mappings (and to control the pedals), I use a SoftStep foot controller as follows:


So far, these Wyschnegradsky Preludes have been a revelation! I'm working my way through the set, and have recorded the first two here:
The first prelude is little more than a whimsical introduction, but the second prelude is already a masterpiece, with drooping chromatic chords that remind me of Rachmaninoff.


Saturday, May 23, 2015

UPDATED: A new MIDI sostenuto pedal solution with Pianoteq

In my video on rolled chords with the independent sostenuto pedal, the piano sound is generated by Pianoteq 5, indispensable software for anyone who wants to get a realistic acoustic sound from a MIDI keyboard. At the time I published the video, Pianoteq didn't support the independent sostenuto pedal. This has been fixed as of last month—there's now an option to have the sostenuto pedal ignore dampers raised by the damper pedal!

My original method of hacking a sostenuto pedal can now be greatly simplified. I still use a Pure Data patch to "convert" my USB pedal into a sostenuto pedal. However, the patch only needs to send controller messages to the Pianoteq virtual instrument; the sostenuto effect is correctly managed within Pianoteq. My new patch is here: http://edwardneeman.com/sostenutoPianoteq.pd

The setup instructions are still the same as before. However, Pianoteq will be receiving MIDI data from two separate sources: the MIDI keyboard, and Pure Data. To send MIDI data from Pure Data to Pianoteq, I do the following (this is Mac specific):


  1. Open the Application "Audio MIDI Setup".
  2. Under the Window menu, select "MIDI Studio".
  3. Doubleclick IAC Driver to open the "IAC Driver Properties" window.
  4. Make sure the "Device is online" box is checked.
  5. In the Pure Data application, select "MIDI Settings" under the Media menu.
  6. Set the Output Device to IAC Driver.
  7. Pianoteq will now need to accept MIDI data from both the IAC Driver and the external MIDI from the keyboard.
  8. In Pianoteq, select "Audio/MIDI Setup" in the File menu.
  9. Make sure all the relevant inputs are checked under "Active MIDI inputs", or just check "Listen to all MIDI inputs".
  10. Don't forget to select the independent sostenuto option! Right-click (or control-click) the sostenuto pedal and check the "Ignore the damper pedal" box.
Happy pedaling!

Wednesday, March 18, 2015

Using the Independent Sostenuto Pedal for Rolled Chords

In a previous post and video, I dealt with how an independent sostenuto pedal—that is, a sostenuto pedal that works even when the damper pedal is depressed—can be used to expand the possibilities of pedaling technique. I recently posted a video that gets much more specific, focusing on how the independent sostenuto can be used to pedal rolled chords.

I covered the technique involved in my previous post (under the heading “Only Hands Small”). In cases where the notes of the rolled chord cannot be held simultaneously, the sostenuto pedal can catch one or more notes (usually the bass notes). The damper pedal can thus be used with much more flexibility, since it’s no longer required at the beginning of the roll to sustain the full chord.

In the video, I use this example from the Nocturne in C minor, Op. 48, No. 1 by Frédéric Chopin:


By catching the bass notes of the arpeggiated chords on the sostenuto pedal, it becomes possible to change the damper pedal at the end of each roll, keeping a legato line in the treble voice.


Gabriela Montero’s splendid performance of this Nocturne is a good example of how the treble voice can end up with gaps due to pedaling, without the assistance of the sostenuto. Here is my demonstration of how to use overlapping pedal in the passage.

I should mention that there is another common pedaling technique to get a legato melody line without using the sostenuto pedal at all. By holding the melody notes over the pedal changes, it’s possible to avoid gaps in the melody.


The melody will be slightly blurred, because consecutive notes will overlap on a single pedal, but it is so subtle that it is unlikely to be a problem. The passage from the Nocturne is particularly amenable to this technique, because the overlapping melody notes usually fit with the following chords. Lugansky’s performance of this Nocturne is a stellar example of how this can work. However, it can be more difficult with small hands, because the speed of the roll and the quiet dynamic require the chords to be played legato with stretching.

Compared with holding melody notes, the main advantage of overlapping pedals is legato transitions between the full chords, not only between the top melody notes. Actually, the two techniques are closely related; both involve sustaining notes over pedal changes. This is an important technique for advanced pianists and one that is greatly enhanced by the independent sostenuto pedal. Holding the bass notes of rolled chords is just the tip of the iceberg.

Symphonic Etudes

In my video, I demonstrate how the opening rolls of the Symphonic Etudes, Op. 13, by Robert Schumann can be played with the assistance of the sostenuto pedal. I have highlighted the notes that I catch on the sostenuto pedal in the example below:


This example is more complicated, because the music seems to ask for quicker rolls than in the Chopin Nocturne, and it requires some quick footwork to get the desired notes on the sostenuto. I use a slightly different technique for more reliable results. Instead of catching the desired note during the roll, I catch that same note from a previous chord, using the partial sostenuto technique. After playing the chord, I press the damper pedal, lift all the other notes, and press the sostenuto pedal to catch only the desired note. Here is how it works:


The disadvantage of this method is that the E will slightly blur the F sharp minor chord on the first beat of the second bar, but the blurring is usually too slight to be heard. I use this technique on two of the three chords highlighted above; in the case of the final chord, I find that catching the B sharp from the first beat of the fourth bar compromises the D sharp dominant seventh on the next beat.

Hommage à Rameau

In the second movement of Images, Book 1 by Claude Debussy, the sostenuto pedal can be used to assist with a rolled A major chord, abruptly returning to a piano dynamic after a crescendo:


I roll the chord hand over hand in order to have more time to catch the bass with the sostenuto pedal. If played as written, the left hand has to jump immediately after playing the bass A octave, leaving only a very tight window to catch those notes.

Many pianists, including Marc-André Hamelin, take advantage of the sudden shift to make a dramatic break in the melodic line. This is a very effective and musically justified solution. However, I like the effect of a sudden piano without such an obvious gap, as if the music were in free fall and elegantly landed into a soft A major web. In fact, this is one of my favorite applications of the independent sostenuto pedal in the standard piano literature. Regardless of one’s preference, having the option of using the sostenuto pedal greatly enhances the musical possibilities of this passage.

Constructing a Virtual MIDI Sostenuto Pedal

This post explains how I created the sostenuto pedal that I used for this video.

An independent sostenuto pedal is a pedal that catches the dampers of any keys that are being played at the time the pedal is pressed. It works slightly differently from the sostenuto pedal on an acoustic piano. Normally, the damper pedal can interfere with the acoustic sostenuto—if the damper pedal is down, the sostenuto pedal can’t be pressed effectively until the damper pedal is raised again. The independent sostenuto pedal removes this limitation, allowing the two pedals to be used together freely and intuitively.


In an earlier post, I showed how to “hack” the acoustic mechanism to create an independent sostenuto pedal. This can be a great way to experience its potential on your own instrument, but the method can be complicated and time consuming and doesn’t work on every piano. Fortunately, the “mechanism” of an electronic keyboard is much simpler (at least until the point of sound production), so creating a sostenuto pedal on a keyboard is quick and reliable.


On most three-pedal keyboards, the middle pedal works like an independent sostenuto pedal by default. If you invested in something like this, you're already set.


However, a three pedal set for a keyboard can be a bit pricey, and it may not be worth it if you play mostly acoustic instruments. Here’s a simple way to construct a virtual sostenuto pedal that costs less than $20. You will need the following:
  • A laptop (if you don’t have one, this is still your cheapest option)
  • A MIDI to USB cable (available here for $7.15 at time of writing)
  • A USB foot pedal (available here for $10.75 at time of writing)


I still own a keyboard with a traditional MIDI hookup (Casio PX-120), but these are almost obsolete. More recent models have a USB connection, meaning the MIDI to USB cable would be swapped out for a normal USB cable, saving a few more dollars.


The Principle


My virtual sostenuto pedal works by sending the MIDI data from the keyboard to the laptop, altering that MIDI data, then sending it back to the keyboard. MIDI is a code that electronic instruments use to speak to one another and to computers. There’s MIDI code for a wide variety of things, including pushing the damper pedal (sends a value of 127 to controller 64), pitch bend (sends a value between 0 and 16,384 to the pitch wheel), or an emergency “reset” button that turns off all sound (“All Notes Off”, or a value of 0 to controller 123). In a typical keyboard performance, the vast majority of MIDI data are note events. Note On events occur when a note is pressed. They specify the key number (from 0 to 127, middle C is 60, A4 is 69) and how hard the key is struck (also called "velocity" with a value from 1 to 127). Note Off events occur when a key is released. They also specify a key number and have a velocity of 0.


At the time the sostenuto pedal is pressed, it checks which keys are being played. Our virtual sostenuto pedal will need to keep track of the MIDI note events so that it knows which keys to sustain. As long as the sostenuto pedal isn’t used, any MIDI data sent to the computer gets bounced straight back to the keyboard. When the sostenuto pedal is pressed, a “snapshot” of the state of the keyboard gets saved. Any notes that were being played will not be released as long as the sostenuto remains down. That means that the certain Note Off events coming from the keyboard won’t be passed back. When the sostenuto pedal is released, those Note Off events are sent all at once, with the exception of those that correspond to a note still being held at the time.


The Setup


Even though it’s not too difficult to manipulate the flow of MIDI data as outlined above, I don’t currently have a quick solution. My system is the result of hours of experimentation, and even once you’re equipped with all my tools it takes a while to set up. I’d welcome any ideas of how to streamline the process. I made a rudimentary patch using Pure Data, a free and open source visual programming language especially designed for musicians. I’ve posted my patch here.


Here are the steps to configuring your sostenuto pedal:


  1. Connect the keyboard to the computer using the MIDI to USB cable.
  2. Connect the USB pedal to the computer.
  3. Turn off the Key Repeat option on the computer. On my Mac, this option is in System Preferences->Keyboard. If you don’t do this, the USB pedal may not work properly.
  4. Download and install Pure Data, then download and open my thirdpedal.pd patch. Note that Pure Data is a powerful program with a steep learning curve. It's a valuable tool for musicians though, and I highly recommend learning the basics of its operation. This is a great tutorial.
  5. Check to see if the MIDI is working correctly. When you play notes on the keyboard, the keyboardStatus graph in the thirdpedal patch should change. If not, check the MIDI settings in Pure Data or in the system preferences. On my Mac, the MIDI preferences are hidden in a separate application “Audio MIDI Setup”.
  6. Click the “toggle sostenuto function” button at the top of the thirdpedal patch so that an X appears.
  7. Try out the USB pedal. When you push the pedal, it will send a keystroke to the computer. You can figure out which keystroke by checking the key number box at the top left of the thirdpedal patch. My USB pedal will function like a giant “B” key by default, which is key code 98.
  8. If your pedal sends a different keystroke, you can set the number by clicking and dragging in the number box below the “toggle sostenuto function” button. (The box that says “set the pedal number here”).
  9. Turn the local control off on the keyboard. This will cut the connection between the physical keyboard and the keyboard’s audio output. This step is important, because you want the MIDI data to be filtered through the computer before it comes back to the keyboard and is converted into audio, like in this diagram:

I haven’t tried to adapt any of this process to any setup other than my own. If anyone does attempt to set up their own virtual sostenuto, I would be happy to help where I can, and would welcome any feedback! Good luck.


What Happens


You can view the status of the keyboard (which notes are pressed, and at what velocity) in the keyboardStatus graph on the thirdpedal patch. Pushing the sostenuto pedal will copy the data in the keyboardStatus graph into the pedalStatus graph (which looks exactly the same, but inverted). The patch will filter out any Note Off MIDI commands that correspond to notes with a positive pedalStatus value. The number of blocked Note Off commands is recorded in the suppressedReleases graph. It is important to keep track of the suppressedReleases, because when the sostenuto pedal is lifted, the appropriate number of Note Off commands have to be sent for every pitch that was held on the sostenuto pedal.

Monday, September 15, 2014

A New Pedaling Technique?

This post expands on many of the points covered in my video, "An Introduction to Double Pedaling."

Over the past two months, I have been developing “double pedaling,” a pedaling technique that allows the damper and sostenuto pedals to be used together in new ways. The sostenuto pedal, patented by Albert Steinway in 1874, remains little more than a curiosity among today’s pianists—even many experienced pianists have only a hazy idea of the potential applications of this pedal. Double pedaling greatly increases the possibilities of the sostenuto pedal, giving pianists unprecedented control over the resonance of their instrument. The pedal mechanism on the modern piano has a crucial flaw that prevents or complicates double pedaling in all but the most trivial instances. Fortunately, this flaw is easily fixed with a slight modification.

The Sostenuto Mechanism

The sostenuto pedal is like a selective damper pedal. The actual damper pedal (the right pedal) lifts all the dampers, the sostenuto pedal only holds up the dampers of the notes that are being played when it’s pressed.


The picture above shows the damper lift rods of a grand piano. The sostenuto mechanism consists of two elements: the sostenuto rod (a metal bar that runs lengthwise next to the damper mechanism), and sostenuto tabs (covered in red felt in the above picture, each damper lift rod has a tab attached). When a damper is lifted, the corresponding sostenuto tab goes up with the rest of the mechanism. When the sostenuto pedal is depressed, the sostenuto rod moves into the path of the tabs, preventing the raised tabs from going back down and holding the raised dampers up.


The picture above was taken with the sostenuto pedal depressed. The sostenuto rod has moved into position and has caught two sostenuto tabs, preventing the corresponding dampers from descending.

The dampers that are down when the sostenuto pedal is engaged won’t be held up, because their sostenuto tabs are under the sostenuto rod. Those dampers will still go up when the corresponding keys are pressed, but their sostenuto tabs will remain underneath the sostenuto rod. To facilitate the normal action of these dampers, the sostenuto tabs are attached to the damper mechanism with a hinge so that they can bend downwards, as in the picture below.


The Problem with the Sostenuto Pedal

This brief discussion of the sostenuto mechanism demonstrates why the sostenuto pedal does what it does: it holds up any dampers that are raised when it is depressed. It’s worth taking a step back, though, and asking the question, what should the sostenuto pedal do? My answer: the sostenuto pedal should hold up only the dampers that correspond to piano keys that are being played.

There is a small but crucial difference between what a sostenuto pedal does and what it should do. As long as the damper pedal doesn’t enter the picture, the sostenuto pedal works correctly—dampers are only raised when the corresponding keys are being played. However, the damper pedal lifts all the dampers, rendering the sostenuto pedal useless! If the sostenuto pedal is pressed while the damper pedal is down, all the dampers will be caught in the raised position, regardless of which keys are being played at the time. While this seems like a small issue, it completely undermines the usefulness of the sostenuto pedal. Classical pianists today use the damper pedal almost all the time in music from Beethoven to the present. As a result, the sostenuto pedal can only be used in unusual situations, and it requires special care so that the damper pedal doesn’t screw it up.

In order to reap the full benefits of double pedaling, it’s necessary to modify the mechanism so that the damper pedal doesn’t interfere with the sostenuto mechanism—in other words, the sostenuto pedal will function as it should, even when the damper pedal is depressed. We can then catch notes or chords on the sostenuto pedal while the damper pedal is down.


The Solution

The problem boils down to the fact that playing notes on the keyboard and pressing the damper pedal are equivalent as far as the damper action is concerned. In both cases, the dampers are raised in the same way, to the same height. The key to solving our double pedaling problem is to restrict the damper pedal so that it raises the dampers to a slightly lower level.

Experienced pianists know that pedaling is not really a binary thing. There’s the “black and white” of pedal up and pedal down, but there’s also an infinity of grays in between. This “half-pedal” zone can be tested by depressing the pedal very slowly and continuously testing the piano’s resonance. Half-pedal is a deceptive term, as it’s actually much closer to the “up” pedal position. At the position we call “half-pedal” (or quarter-pedal, or three quarters-pedal) the pedal is barely depressed, and the dampers are barely raised off the strings, muting them to some degree. Once the pedal has been depressed further, to about half or three quarters of the way down, the dampers are already fully off the strings and the piano sounds exactly like it does at full pedal. A fully-depressed pedal lifts the dampers an extra few millimeters, but doesn’t actually change the sound of the instrument. However, these millimeters are crucial, because the damper needs to be lifted all the way in order to be caught be the sostenuto pedal.


I’ve illustrated this in the diagram above. The “sweet spot” refers to the point in the damper’s upward trajectory where the dampers are fully off the string, but are not yet high enough to be caught by the sostenuto pedal. Restricting the damper pedal’s range so that it can’t go past the sweet spot will prevent the damper pedal from interfering with the sostenuto pedal. Pressing a key on the keyboard will still lift the damper all the way.

On most pianos, restricting the damper pedal is a simple operation that only takes a few minutes. There is usually a screw that is attached to the bottom of the body of the piano, above the damper pedal rod. Adjusting the screw is one solution (see the picture below).


For a quick fix, or for pianos without an adjustable screw, there are various points in the pedal action where a barrier can be added to restrict the pedal motion. In the picture below, I added a folded piece of paper at the top of the pedal lyre.


Troubleshooting a restricted pedal

Restricting the damper pedal should allow double pedaling on any well-regulated instrument. Unfortunately, many instruments, even carefully maintained concert instruments, have issues with the sostenuto mechanism that are ignored because the sostenuto pedal is so rarely used. The adjustments suggested below can be attempted if restricting the damper pedal doesn’t produce the desired results, and should only be carried out by a trained piano technician.

The most common problem is that the sostenuto rod is not in the correct position and catches dampers that are barely raised. The diagram below shows how a faulty sostenuto mechanism can cause instruments to have no sweet spot at all.


This can be solved by adjusting the sostenuto rod so that it catches the tabs in a higher position.

Sometimes the sostenuto pedal is not consistent, catching some notes but not others. This happens when the dampers are lifted unevenly. Regulating the dampers is a major operation that can take several hours. Depending on how severity of the problem, adjusting the sostenuto rod instead may be a more cost-effective solution. For the purposes of double pedaling, it’s advantageous to have the dampers lift further off the string, which increases the size of the sweet spot. However, too much lift can affect their ability to dampen the strings promptly on release of a key, since only the force of gravity returns the dampers to the rest position!

Another common problem occurs when notes are caught on the sostenuto pedal after the pedal is depressed. Sometimes the hinge on the sostenuto tab does not work correctly, so that the tab “jumps” over the engaged sostenuto bar instead of flexing down. This may require adjusting or replacing the faulty tabs.

Double Pedaling Techniques

Once you’ve “liberated” the sostenuto pedal from the damper pedal, you’re ready to explore all the possibilities of double pedaling. I’ve found four basic double pedaling techniques:

1. Joint Pedaling

In joint pedaling, the sostenuto pedal catches part of a larger sonority (usually including a bass note). The damper pedal is then used normally, but with the advantage that the pedal can be changed without losing the sonority. Most double pedaling applications in the standard repertoire fall under this category.


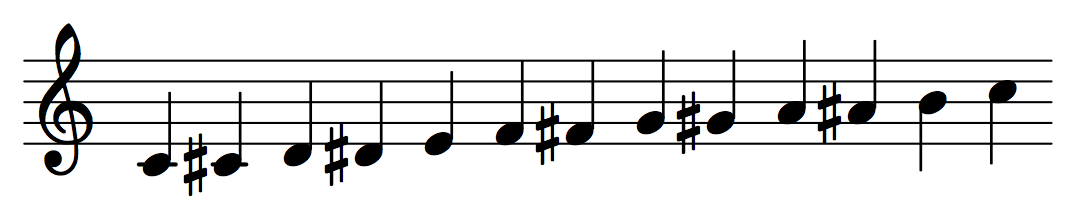
In the above passage from “Ondine” from Gaspard de la nuit by Ravel, it’s impossible to achieve a legato bass line as marked without double pedaling. Holding the C sharp with the damper pedal blurs the change of harmony on the second beat. By catching the C sharp with the sostenuto pedal, the damper pedal can be changed on the second beat without losing the bass.

This would normally require the pianist to keep the damper pedal raised while the sostenuto pedal is depressed, creating a gap in the sonority that undermines the sensual sweep of the right hand arpeggio. Restricting the damper pedal solves this problem!

2. “Only Hands Small” Technique

Do you have small hands but big ideas? Pianists with smaller hands often have to break chords or release notes early, and are left with the dilemma of either losing the full sonority or muddying the pedal. By catching some notes with the sostenuto pedal immediately before a damper pedal change, it’s possible to overcome this disadvantage. Here’s an illustrative passage from the Piano Concerto No. 2, Op. 44 by Tchaikovsky:


My left hand isn’t big enough to hold the bass D in the final rolled chord. That means that I need to change my pedal early in the roll (before the F sharp) to catch the bass D.


This solution is not ideal, since it makes it impossible to preserve a legato connection between the melody D in the right hand and the preceding E. A better solution is to catch the bass D with the sostenuto pedal, allowing me to change the damper pedal at the melody note without losing the bass.


It is important to release the E octave in the right hand (shown in the full except above) before beginning the roll; otherwise it will be caught on the sostenuto pedal and will blur the D major chord. The E will still be held on the damper pedal.

3. Overlapping Technique
Overlapping the damper and sostenuto pedal can produce all kinds of highly complex sonorities. The current piano repertoire doesn’t offer too many opportunities for interesting overlapping effects. This is an area that I hope will be explored soon by budding composers.

Here’s one example of overlapping technique, from the Piano Concerto No. 3, Op. 30 by Rachmaninoff. This passage alternates between two chordal melodies moving in different directions. While Rachmaninoff doesn’t indicate it, you can get an interesting effect by sustaining each melody while the other melody is active, for a true contrapuntal texture.

Here is the conventional pedaling approach:


Most recordings use this pedaling, or something similar. This pedaling sustains both melodies equally. However, you can still hear an eighth-note gap in one of the melodies at each pedal change (shown with big red rests):


Theoretically, double pedaling lets you play both melodies legato, without any gaps. On each beat of each measure, first change the damper pedal and then change the sostenuto pedal:


It works as follows: on the first beat, the damper pedal goes down, and then the sostenuto pedal catches the chord from the upper melody. On the second beat, the sostenuto pedal holds the upper melody while the damper pedal changes, and then changing the sostenuto pedal catches the lower melody. On the third beat, the sostenuto pedal holds the lower melody while the damper pedal changes, and then changing the sostenuto pedal catches the upper melody! And so on. This pedaling looks intriguing on paper, but in practice I found it too cumbersome at tempo. Still, it shows some of the vast potential of the overlapping technique.

4. The Partial Sostenuto
Double pedaling enables catching part of a chord on the sostenuto pedal. That’s impossible with conventional pedaling, at least without releasing the extra notes. The “partial sostenuto” technique is useful in this passage from the Etude-tableau Op. 39, No. 7 by Rachmaninoff:


With double pedaling, I can catch the first chord in the left hand of this example without catching the right hand notes. First, I play the chord and depress the damper pedal. I can then lift my right hand and the pedal will keep the melody ringing. Since I am no longer holding down the right hand notes, they won’t be caught when I press the sostenuto pedal to catch the left hand chord.

Conclusion

I have only begun experimenting with double pedaling technique over the course of the past few months, and I am already convinced that it is a powerful tool that has wide-ranging potential to enhance the coloristic and expressive capabilities of the modern instrument, with numerous possible applications in the standard piano repertoire. Modifying the pedal mechanism to allow double pedaling is a simple operation that can be achieved without any additional piano parts—only minor adjustments are necessary.

My goals with my double pedaling project are as follows:

1) To increase awareness of the sostenuto pedal’s function and its applications, and to develop and spread the practice of double pedaling.

2) To make a working sostenuto pedal a standard part of every instrument. Many entry-level grand pianos still do not have sostenuto pedals, and it is rare to encounter an upright piano with a sostenuto pedal (Steinway uprights, select Bösendorfers and the Yamaha YUS series are the exceptions). Of course, having a sostenuto pedal on a piano does not mean that it will actual work, as keeping it regulated is frequently seen as optional!

3) To encourage piano makers to modify their pedal mechanisms in house, so that double pedaling works correctly on new pianos without any further modifications.

I’m optimistic that I’ll see some real progress in these areas in the near future. Unfortunately, I don’t anticipate it will be a smooth road. The current environment in the piano world is very hostile to any innovation in piano design. So I’m asking for your participation! I would love to hear any feedback on double pedaling, or any new pedaling ideas that you might have. Also, please share this article and my video on double pedaling, which is available here: http://youtu.be/AWEFgQyCRok

Thanks!

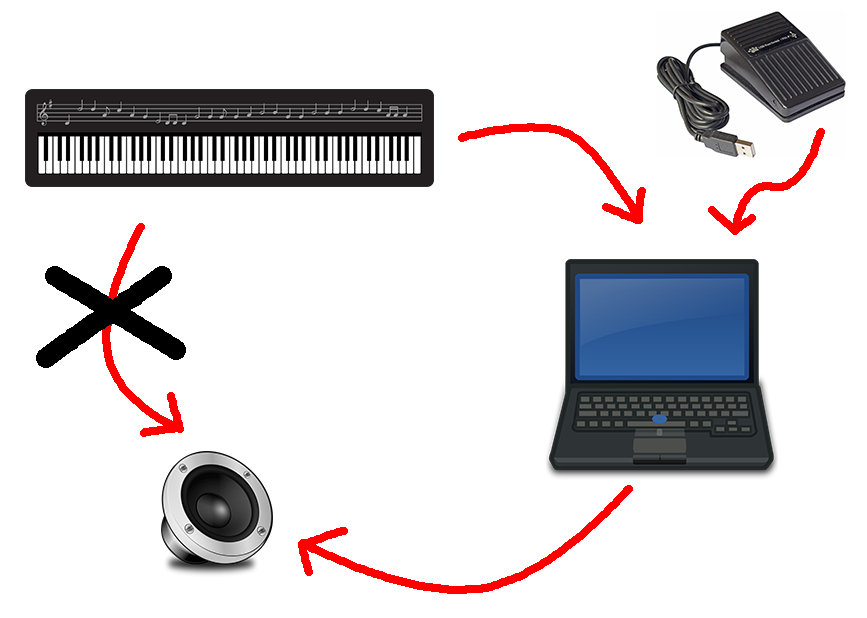
As a final note, there is one type of piano that consistently has a working sostenuto pedal: electronic pianos. On most full size modern keyboards, it’s simple and cost-effective to buy a pedal board with a sostenuto pedal, if it’s not already included. Due to a quirk in the way that keyboards are programmed, it is slightly easier to have a sostenuto pedal that works independently of the damper pedal than the alternative. It’s not surprising that keyboard manufacturers have taken the path of least resistance and have developed a sostenuto pedal that works perfectly for the purposes of double pedaling.

Happy pedaling!